The best low cost battery monitors
Today we are going to get into the issue of batteries, one of the most expensive goods on our boats and the easiest to break down or run out, causing us the consequent annoyances.
In the video we can see the basics of the monitors, the simplest and cheapest that only control the battery voltage, those that already allow us to know at what rate it is discharging, and the most advanced ones that keep track of how much energy comes out and enters the battery, being able to accurately show us the battery percentage. remaining.
In this last category we are going to see devices that work very well and are of great quality, such as those from Victron, which can now be replaced by much cheaper Chinese alternatives, but with very good levels of quality and that offer practically the same functionalities, costing almost 10 times less.
For example. Here is a list of options:
✅ The most complete and cheapest battery monitor:
🔵 On AliExpress: https://s.click.aliexpress.com/e/_9z4jA1
🔵 On Amazon a little more expensive: https://amzn.to/3uIQJ5E
✅ Simple USB Charger Voltmeter:
🔵 On AliExpress: https://s.click.aliexpress.com/e/_AoBgC6
🔵 On Amazon: https://amzn.to/3GIXeaE
✅ My Victron solar charger that I also have connected to the Raspberry:
🔵 https://amzn.to/35jxF30
✅ Victron’s battery monitor, good, nice and a bit expensive:
🔵 https://amzn.to/3Lsbxnz
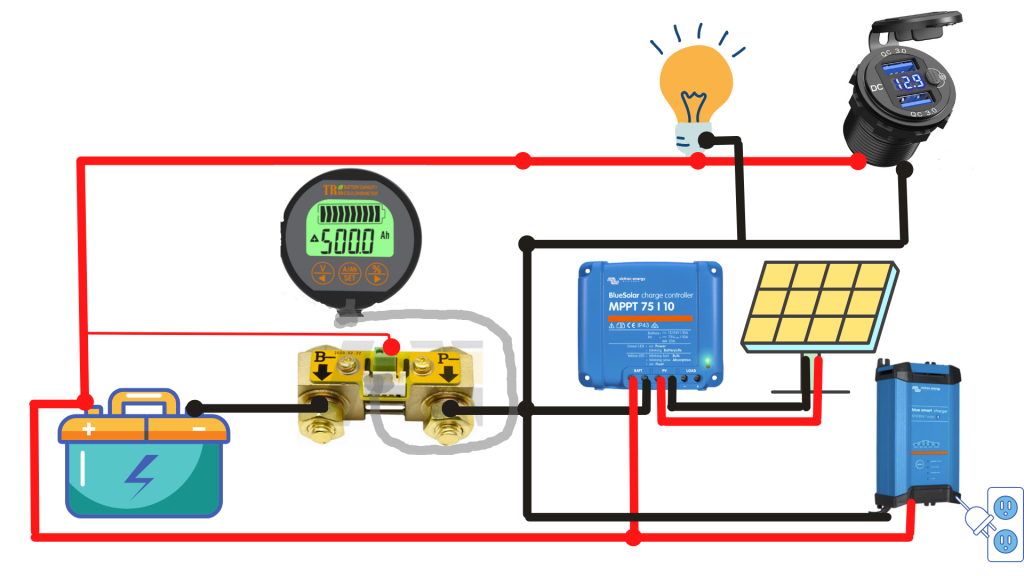
All these battery monitors are connected in a very similar way, and almost all of them are based on the installation of a Shunt in the negative pole of the battery, corresponding to the scheme like this:

But beyond the displays of battery monitors, it is always interesting to be able to connect it to our Raspberry to exploit the information in a more advanced way, and making battery status information available from anywhere, either in the boat or even from home.
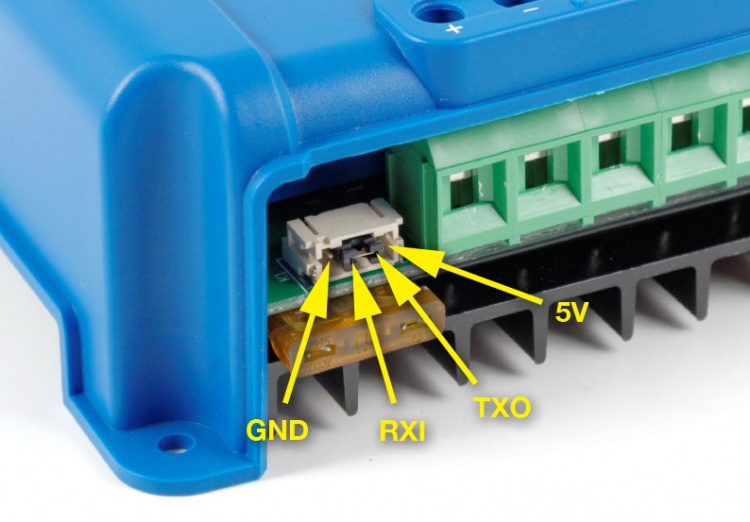
To do this, Victron devices can be easily connected via USB to the Raspberry and consult their data in signalK, thanks to the VEDirect plug-in that it integrates and using its own cable or manufacturing one very easily.
✅ To connect Victron products to the Raspberry:
🔵 Official cable (€42) https://amzn.to/3gGzXMc
🔵 To make the cable yourself:
🔸 Wire https://s.click.aliexpress.com/e/_AdwTg1
🔸 JST PH2.00mm 10cm 4P connector https://s.click.aliexpress.com/e/_AO1j5b
🔸 Scheme https://beta.ivc.no/wiki/index.php/Victron_VE_Direct_DIY_Cable
🔵 Plugin for signalK https://github.com/SignalK/vedirect-serial-usb

With which we can connect to the connector of our Victron.

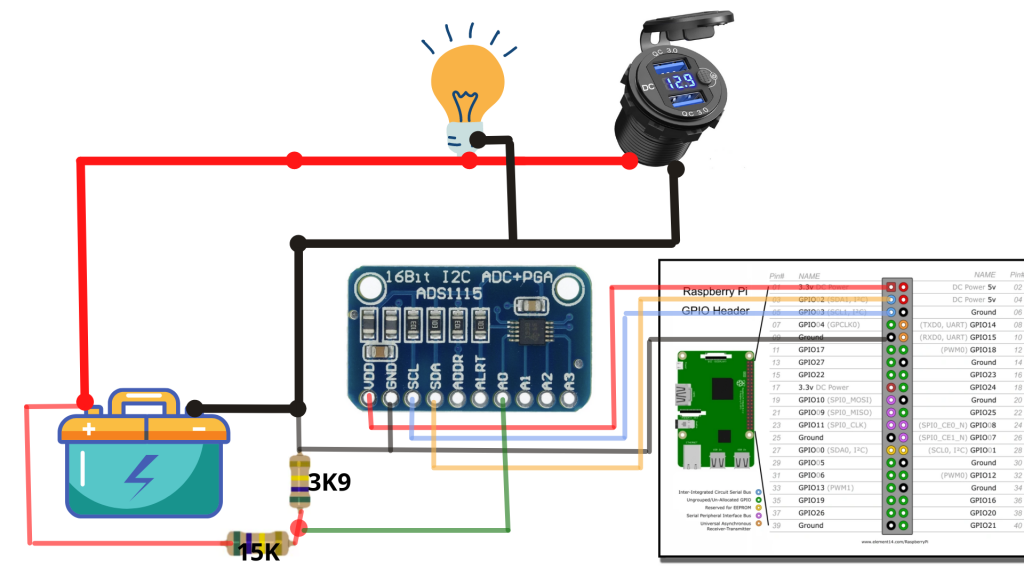
But if we do not have a Victron device, we can also monitor and consult the battery data through our Raspberry with a circuit like the following, the instructions in our video and the components that we detail at the end.

✅ To measure the batteries directly from the Raspberry:
🔵 ADS1115 board
🔸 AliExpress https://s.click.aliexpress.com/e/_AFDDg1
🔸 Amazon https://amzn.to/3GFNEp3
🔵 Kit for prototypes
🔸 AliExpress https://s.click.aliexpress.com/e/_9zg7v3
🔸 Amazon https://amzn.to/3BiNWBo
🔵 3.9K and 15K resistors:
🔸 AliExpress https://s.click.aliexpress.com/e/_A0Ua05
🔸 Amazon https://amzn.to/3Bc1xdC
🔵 Cables to connect to the Raspberry:
🔸 AliExpress https://s.click.aliexpress.com/e/_AdDLNT
🔸 Amazon https://amzn.to/34RfoK1
